How Titration Works (Infographic)
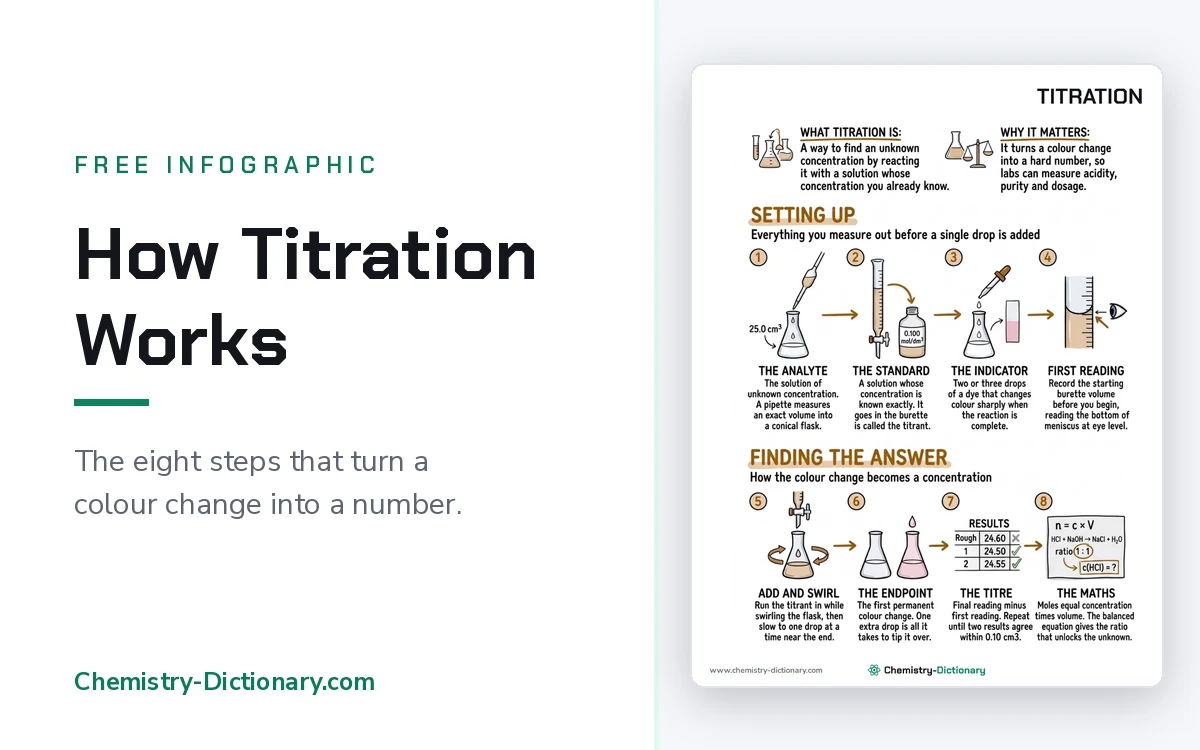
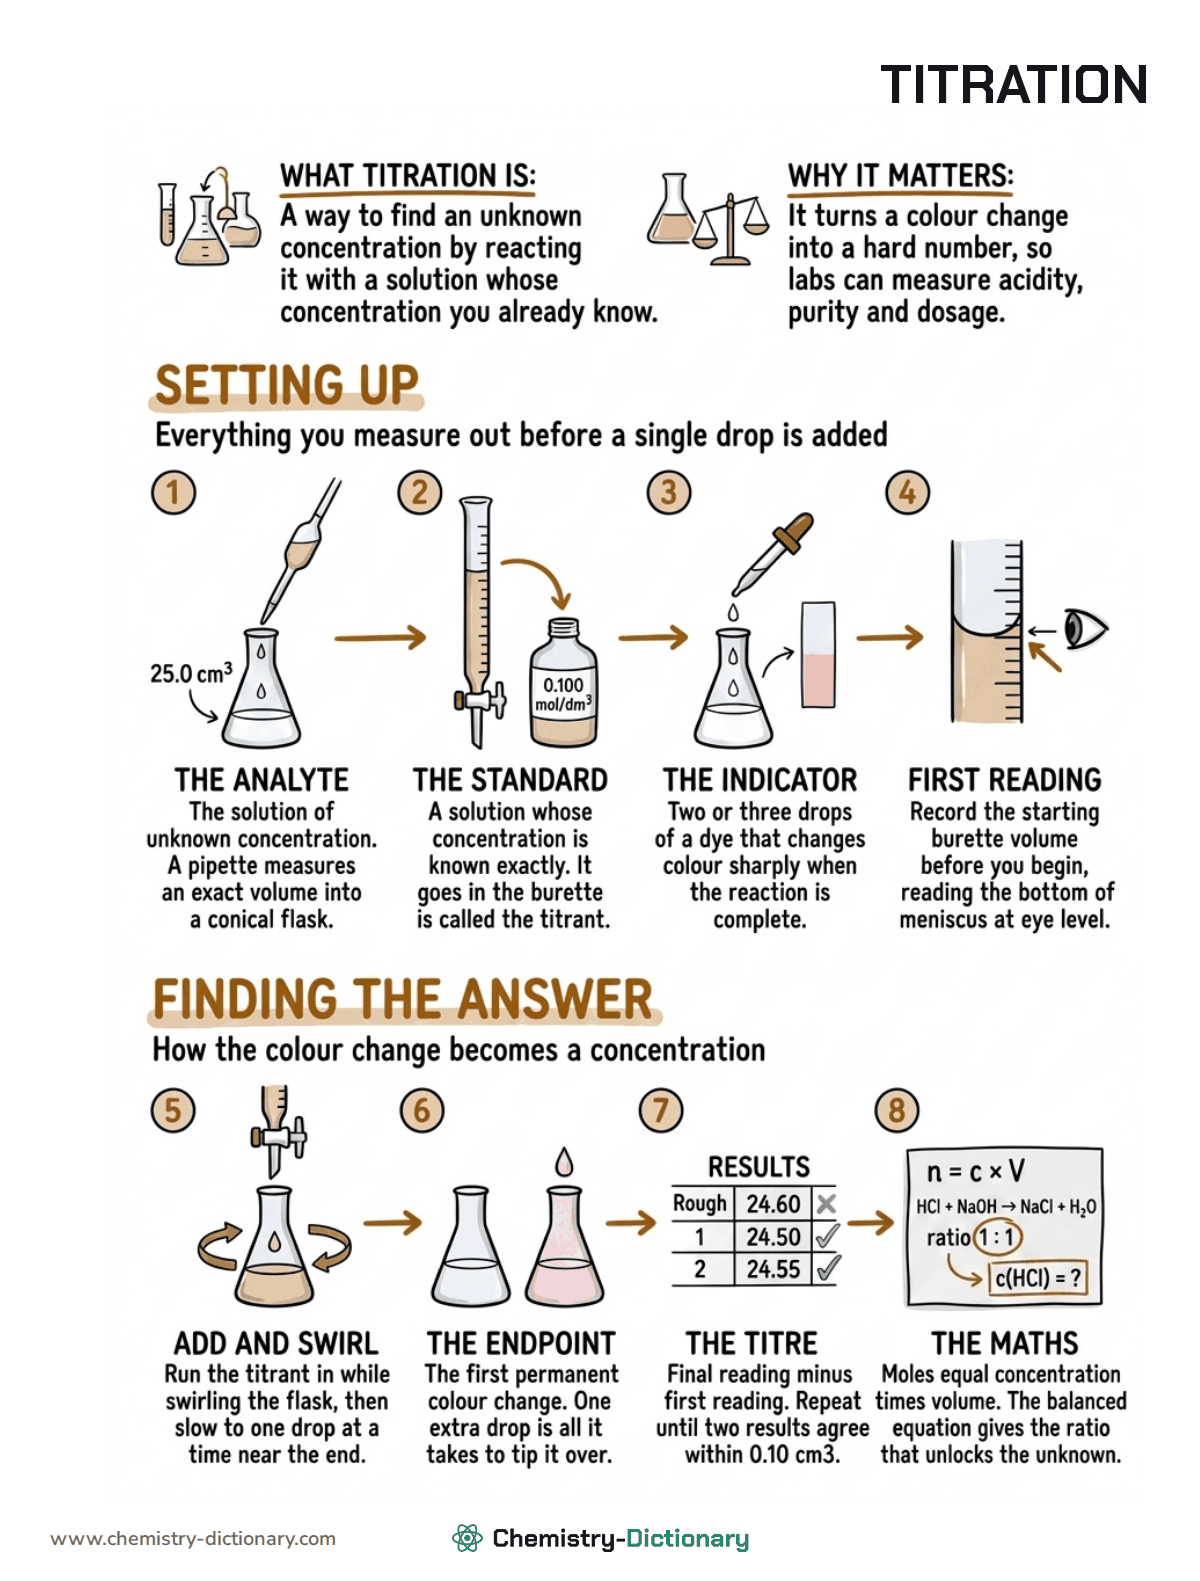
A titration finds the unknown concentration of a solution by reacting it with a solution whose concentration you already know. You add the known solution from a burette until the reaction is exactly complete, record the volume you used, and turn that volume into an answer with the balanced equation. The infographic below walks through all eight steps, from measuring out the first 25.0 cm3 to the final calculation.
You are welcome to use it. Teachers can download, print, and hand it out with no strings attached. If you want to publish it on a website, that is free too, and all we ask is a visible credit link. The embed code is further down the page.
Key takeaways
- A titration measures one thing only: the volume of a known solution needed to react completely with a fixed volume of an unknown one.
- The solution being tested is the analyte. The solution of known concentration added from the burette is the titrant.
- The indicator does not give you the answer. It only tells you when to stop adding titrant.
- The volume you used is called the titre: final burette reading minus first burette reading.
- The calculation is two steps. Moles equal concentration times volume, and the balanced equation gives the mole ratio that converts one substance into the other.
- Repeat until two titres agree within 0.10 cm3, then average only those concordant results.
What a titration actually measures
You cannot count molecules directly. A titration gets around that by reacting the substance you cannot measure against one you can, and letting the reaction do the counting for you.
Everything is arranged so that only one number changes from run to run. The volume of analyte is fixed at exactly 25.0 cm3 by a pipette. The concentration of the titrant is fixed and known, usually 0.100 mol/dm3. The reaction itself is fixed by the balanced equation. That leaves the volume of titrant as the only variable, so it carries all the information.
This is why chemists care so much about technique. A titration is a single measurement repeated until it is trustworthy, and every part of the procedure exists to protect that one number.
One more piece of vocabulary is worth getting right early. The equivalence point is the moment when the two substances have reacted in exactly the ratio the equation demands. The end point is the moment the indicator changes colour. A well chosen indicator makes these two almost identical, but they are not the same idea, and exam questions love the difference.
Use this infographic on your site
This diagram is free to republish. Copy the code below and paste it into any page, blog post, or learning platform that accepts HTML. It embeds the full-size image and keeps a visible credit link back to this page. If you are a teacher rather than a publisher, skip straight to the print PDF, because classroom use asks nothing of you at all.
Teachers and lab technicians should ignore the code entirely: download the print PDF, which is Letter size and fits on one page, or download the PNG for slides. Print it, photocopy it, stick it on the lab wall, put it in a worksheet. No permission needed and no attribution required. If you do use it somewhere we would genuinely like to see it, so feel free to send us a link.
The eight steps, one at a time
1. The analyte
Use a pipette to transfer an exact volume of the unknown solution into a conical flask, normally 25.0 cm3. A pipette is used rather than a measuring cylinder because it is far more precise, with an uncertainty of about 0.06 cm3 on 25 cm3. The conical shape matters too, because it lets you swirl vigorously without splashing anything out.
Rinse the pipette with the analyte before you use it. Rinse the conical flask with distilled water only. Rinsing the flask with the analyte would add extra moles you never accounted for, and it is one of the most common ways to ruin a result.
2. The standard solution
Fill the burette with a solution whose concentration is known exactly. This is the standard solution, and once it is in the burette it is called the titrant. Rinse the burette with the titrant first, because any water left inside would dilute it.
Run a little through the tap before you start to clear the air bubble from the tip. An air bubble that escapes during the titration adds volume to your reading that never reached the flask, which makes the titre too large.
3. The indicator
Add two or three drops of indicator to the flask, and no more. The indicator is itself a weak acid or weak base, so a large amount would react with the titrant and shift your result.
Which indicator you pick depends on the reaction. Phenolphthalein, which turns from colourless to pink, suits a strong acid with a strong base or a weak acid with a strong base. Methyl orange, which turns from yellow to red, suits a strong acid with a weak base. The rule behind both choices is that the indicator must change colour over a pH range that falls inside the steep part of the titration curve.
4. The first reading
Record the starting volume in the burette before you add anything. Read the bottom of the meniscus, with your eye level with the liquid surface, and write the number to two decimal places. A burette is graduated every 0.10 cm3, so readings end in 0.00 or 0.05.
Reading from above or below the meniscus introduces a parallax error, and because it is systematic it shows up in every single run. Neat, repeatable, and wrong.
5. Add and swirl
Open the tap and run the titrant in while swirling the flask continuously. Swirling matters because the reaction happens where the two solutions meet, and an unmixed flask can show a flash of colour that disappears again.
Go quickly at first, then slow down as you approach the expected volume, until you are adding one drop at a time. Near the end you can rinse the flask walls with a little distilled water to wash down any splashes. This does not change the number of moles in the flask, so it does not affect the result.
6. The endpoint
The endpoint is the first permanent colour change. One extra drop is genuinely all it takes to tip a titration over, because the pH swings sharply once the reaction is nearly complete.
Permanent is the key word. A colour that appears and then fades as you swirl means you are close but not there. Stop at the first colour that survives ten seconds of swirling.
7. The titre
Subtract the first reading from the final reading. That difference is the titre, and it is the measurement the whole experiment exists to produce.
Your first run is a rough titration, done quickly to find roughly where the endpoint sits. Do not include it in your average. Then repeat carefully until two titres agree within 0.10 cm3. Those matching results are called concordant, and only they go into the mean.
The 0.10 cm3 tolerance is not arbitrary. Each burette reading carries an uncertainty of about 0.05 cm3, and a titre involves two readings, so 0.10 cm3 is roughly the smallest disagreement the glassware can honestly resolve. A single drop is about 0.05 cm3, which on a 25 cm3 titre is a 0.2 percent error.
8. The maths
Everything now runs through one relationship, where n is moles, c is concentration in mol/dm3, and V is volume in dm3:
n = c × V
Volumes must be in cubic decimetres, so divide a reading in cm3 by 1000. Note that 1 cm3 and 1 mL are the same volume, so a result written in mL converts the same way.
The steps are always the same three. Find the moles of titrant you added. Use the balanced equation to convert that into moles of analyte. Divide by the analyte volume in dm3 to get its concentration.
A worked example
25.0 cm3 of hydrochloric acid of unknown concentration is titrated against 0.100 mol/dm3 sodium hydroxide. The rough titre is 24.60 cm3, and the two accurate runs give 24.50 cm3 and 24.55 cm3.
Step 1. Find the mean titre. The rough run is discarded. The two accurate runs agree within 0.05 cm3, which is inside the 0.10 cm3 tolerance, so they are concordant.
mean titre = (24.50 + 24.55) ÷ 2 = 24.53 cm3 = 0.02453 dm3
Step 2. Find the moles of titrant.
n(NaOH) = 0.100 × 0.02453 = 2.453 × 10⁻³ mol
Step 3. Use the balanced equation.
HCl + NaOH → NaCl + H2O
The ratio is 1:1, so n(HCl) = 2.453 × 10⁻³ mol.
Step 4. Divide by the analyte volume.
c(HCl) = (2.453 × 10⁻³) ÷ 0.0250 = 0.0981 mol/dm3
Three significant figures is right here, because the least precise value in the calculation is the 0.100 mol/dm3 standard, which has three. If you want to check your own numbers quickly, the molarity calculator and the stoichiometry calculator handle both halves of this.
Where titrations go wrong
Almost every wrong titration answer comes from a short list of causes, and most of them leave the colour change looking perfect.
| Mistake | What it does to your answer |
|---|---|
| Forgetting the mole ratio | Answer out by exactly the ratio, most often a factor of two |
| Rinsing the conical flask with analyte instead of distilled water | Extra moles in the flask, so the titre is too large |
| Air bubble left in the burette tip | Titre too large, because volume left the burette without reaching the flask |
| Including the rough titre in the mean | Skews the average, usually upward |
| Reading the top of the meniscus, or from the wrong angle | Systematic error in every run, invisible in the repeats |
| Overshooting the endpoint | Titre too large; the run has to be repeated |
| Using too much indicator | Indicator reacts with the titrant and shifts the endpoint |
The mole ratio deserves special attention, because it is the one mistake that does not show up in the practical work at all. Consider sulfuric acid against sodium hydroxide:
H2SO4 + 2NaOH → Na2SO4 + 2H2O
Here two moles of NaOH react with one mole of acid, so n(H2SO4) is half of n(NaOH). Treat it as 1:1 and your answer comes out exactly double the true value, with a titre that looked flawless and readings that repeat beautifully. If a titration answer is out by a clean factor of two, check the balanced equation before you blame your technique.
It is also worth separating the two kinds of error. Sloppy swirling or inconsistent judgement of the colour scatters your titres, which you can see in the repeats. An uncalibrated pipette or a mislabelled standard shifts every titre the same way, which you cannot see at all. Repeating a titration protects you from the first kind and does nothing about the second.
Types of titration
The eight steps above describe an acid-base titration, which is the one nearly everybody meets first. The same procedure carries over to other reaction types with only the endpoint detection changing.
- Acid-base. An acid is titrated against a base to the point of neutralization, with a colour indicator or a pH meter marking the end.
- Redox. Electrons are transferred instead of protons. Potassium manganate(VII) is self-indicating, because its own purple colour disappears as it reacts and returns with the first excess drop.
- Complexometric. EDTA is titrated against metal ions to measure water hardness, using a dye that changes colour when it releases the metal.
- Precipitation. Silver nitrate is titrated against chloride ions, and the endpoint is the first appearance of a coloured precipitate.
- Back titration. Used when the reaction is too slow or the sample will not dissolve cleanly. A known excess of reagent is added, and the leftover excess is titrated to work out how much was consumed.
All of them rest on the same idea the infographic ends on: measure a volume accurately, then let the balanced equation and stoichiometry turn that volume into a concentration.
Frequently asked questions
What is the difference between the endpoint and the equivalence point?
The equivalence point is the moment the two substances have reacted in exactly the ratio given by the balanced equation. The endpoint is the moment the indicator changes colour. You can only observe the endpoint, so the skill lies in choosing an indicator whose colour change sits inside the steep pH jump around the equivalence point. When it does, the gap between the two is small enough to ignore. When it does not, the difference is called indicator error.
Why do you repeat a titration?
A single titre could be wrong for reasons you would never notice, such as a drop clinging to the burette tip or a colour judged slightly early. Repeating until two runs agree within 0.10 cm3 shows that your result is reproducible, and averaging the concordant runs reduces random error. It does nothing about systematic error, which is why calibration matters separately.
Why is the conical flask rinsed with distilled water and not the analyte?
Because the pipette has already delivered an exact, known number of moles into the flask. Water added on top changes the concentration inside the flask but not the number of moles, and moles are what the reaction counts. Rinsing with the analyte instead would leave extra moles behind, which need more titrant, which makes your titre and your final answer too high.
Which indicator should I use?
Match the indicator to the pH at the equivalence point. Phenolphthalein changes between about pH 8.3 and 10.0, which suits strong acid with strong base and weak acid with strong base. Methyl orange changes between about pH 3.1 and 4.4, which suits strong acid with weak base. A weak acid titrated against a weak base has no sharp pH jump at all, so no colour indicator works well and a pH meter is used instead.
Can you do a titration without an indicator?
Yes. A pH meter tracks the pH continuously and the equivalence point is read off the steepest part of the curve, which is more accurate than any colour change and works where indicators fail. Some redox titrations need no indicator either, because a reagent such as potassium manganate(VII) changes colour on its own.
My titration answer is exactly double what I expected. What went wrong?
Check the balanced equation first. An answer out by a clean factor of two nearly always means a mole ratio was treated as 1:1 when it was 2:1, which happens most often with diprotic acids such as sulfuric acid. Experimental errors give you messy discrepancies of a few percent, not tidy factors, so a suspiciously round error points at the arithmetic rather than the glassware.
Can I use this infographic in my own lesson or on my website?
Yes to both, and the two cases have different rules. For teaching, meaning lessons, handouts, worksheets, revision packs, and slide decks, in schools or in commercial training, you need no permission and no attribution at all. Just print it or drop it in. For publishing it on a website, we ask for one thing in return: keep a visible credit link back to this page, which the embed code above does for you. In both cases, please do not alter the diagram, crop out the branding, or sell the image on its own.